Brief practical introduction
Are you planning to add modern wall-mounted shelves to a living room or home office? Start by defining the function of each shelf (books, objects, display screen), then combine structural measurements and aesthetic decisions before buying or installing. This practical guide covers steps for measuring and analyzing loads, material and finish options, integrating concealed lighting, and display-styling formulas with examples suited to Egypt and the Middle East.
Design and dimensions — balancing composition and shelf proportions
- Choose shelf depth according to use: 20–30 cm for books (8–12 in), 10–18 cm for objects and decor (4–7 in).
- Shelf length should relate to wall openings and the items to be displayed; avoid overly long shelves without visual supports. Divide the run into modules of 60–120 cm so length-to-height proportions stay balanced.
- Rule of thirds: divide the wall area horizontally and vertically to determine shelf positions and display groupings.
- Odd-number grouping principle: groups of 3 or 5 items look more balanced than even-numbered sets.
Load planning and fixing to anchors, studs and supports
- First rule: if the load exceeds 20 kg/m (≈13 lb/ft), secure the shelf to structural studs.
- The strongest fix for shelves on drywall is a screw driven directly into a timber stud (screw length sized to penetrate 30–40 mm into the stud).
- For concrete or masonry walls: use resin anchors, expansion anchors, or sleeve anchors sized to the substrate and thickness.
- When no stud is available at the desired location: use high-capacity toggle bolts or systems that distribute the load across an array of anchors.
- Standard stud spacing is often 400–600 mm center-to-center (approximately 16"–24"), but verify your walls with a stud finder or inspection camera.
Materials and finishes suitable for contemporary interiors
- Engineered wood (MDF/plywood) veneered in oak or high-quality laminate for a warm, clean look.
- Solid oak or locally sourced dark hardwoods for luxury spaces, finished with natural oil or matte lacquer.
- Powder-coated metal (brackets and supports) for an industrial look; pair with hidden supports for floating shelves.
- Tempered glass for display fronts, with polished edges and thicknesses of 8–12 mm for light display items.
- Finish the shelves in a wall-color-matched or contrasting palette to either conceal or highlight the shelf as part of the design.
Integrating concealed lighting without visible wiring
- Use aluminium LED channel profiles with diffusers mounted under the shelf or integrated into the shelf back; these channels act as both a mounting track and a heat sink.
- Route the power feed to an in-wall junction box or a concealed connection inside an adjacent cabinet. Keep power connections inside the wall or a covered surface conduit painted to match the wall color to avoid visible wiring.
- Low-voltage solutions (12V or 24V) with the driver installed inside a cabinet or wall box reduce ventilation requirements and allow smart switching.
- Wireless options (rechargeable batteries) are suitable for light display shelves but are not ideal for heavy or permanent installations.
- Use a dimmer compatible with the LED strip type to achieve variable display lighting; avoid LED strips that lack adequate heat dissipation.
Professional styling formulas
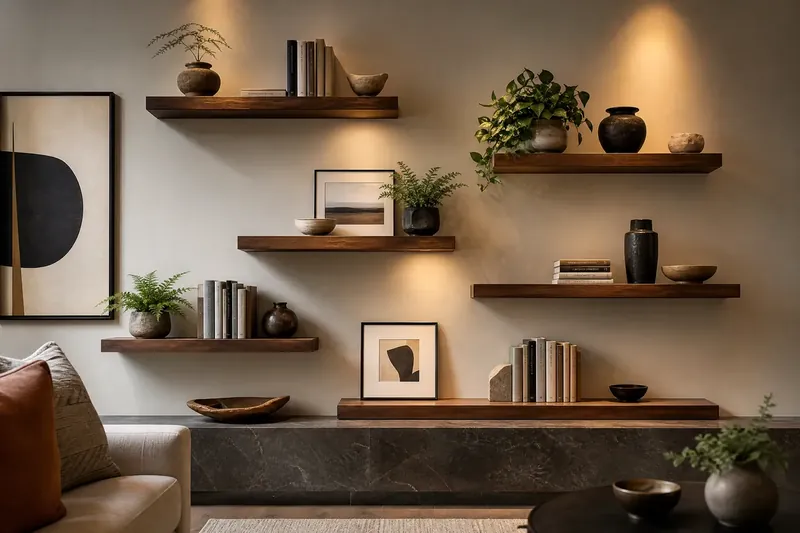
- Arrange by height: place taller pieces beside shorter ones to create a visual gradient.
- Depth layers: set some items forward (5–10 cm) and some back to create a sense of depth.
- Use visual-weight balancing: a stack of books on one side can balance a large ceramic vase on the other.
- Color grading: limit the palette to 2–3 primary colors plus a neutral backdrop.
- Negative space rule: do not fill the shelf completely; leave about 25–35% empty space to ease visual reading.
Practical examples for Egypt and the Middle East
- Cairo apartment: light oak floating shelves, 25 cm depth, warm 2700K LED strips mounted behind book shelves to create a cozy glow against a light earthen plaster wall.
- Seafront villa: black powder-coated metal supports with a mix of low cabinets and floating shelves to display moisture-resistant marine collectibles, with concealed power routed inside a wall panel.
- Dubai home office: 30 cm deep shelves to hold files and small monitors, and a dedicated shelf for a camera and microphone with hidden cable-pass-throughs.
Common mistakes and how to avoid them
- Overloading: do not rely on light anchors to hold a shelf a meter or more long without direct stud backing.
- Visual clutter: avoid placing many small objects on a single shelf; use larger, curated groupings with odd counts.
- Incorrect depth: a shelf too shallow for books causes them to tip forward; a shelf too deep can look lost in a small space.
- Harsh direct lighting: uplighting or very strong bottom-up lights can create hard shadows; prefer backlighting or LED strips with diffusers.
Decision table: choosing the right fix for each wall type
| Wall type | Recommended fixing | Approximate safe capacity per linear metre* (kg/m) | Practical tip |
|---|---|---|---|
| Drywall (no stud) | toggle bolts / load distribution via backing plate | 20–40 kg/m (13–26 lb/ft) | Use a backing board if you need higher loads |
| Wall fixed to timber studs | direct screw into stud + supplementary fasteners | 60–120 kg/m (39–79 lb/ft) | Best option for heavy shelves and books |
| Brick / concrete | expansion anchors or resin anchors | 80–200 kg/m (52–131 lb/ft) | Use anchors rated for concrete substrates |
*Figures are indicative. Capacities vary with anchor type, screw diameter, embedment depth and installation quality. Consult a qualified engineer or installer.
Pre-installation checklist
- [ ] Define use (books / objects / electronics).
- [ ] Measure depth, length and height in millimetres.
- [ ] Locate studs with a stud finder.
- [ ] Choose the correct anchor type for the wall material.
- [ ] Confirm total load capacity per shelf.
- [ ] Plan power routing for lighting (if present) and select an appropriate driver.
- [ ] Choose a finish and test a sample on a small panel.
- [ ] Schedule installation with a licensed carpenter/electrician.
Recommended hardware and accessories
- Corrosion-resistant wall anchors for coastal environments.
- Aluminium LED channels with diffusers.
- Hidden metal supports fixed to studs.
- Heavy-duty brackets for very long shelves.
- Childproof caps and bumpers if the home has young children.
Amazon
To review categories such as Floating Shelves, Bracket Wall Shelves, Picture Ledges, LED Under-Shelf Lighting Kits, Heavy-Duty Wall Anchors, Decorative Bookends and Artificial Succulents we recommend checking product specs and reviews at: Amazon storefront
(We recommend verifying technical specifications, load capacity and reading user reviews before purchasing.)
Safety and execution tips
- For electrical work, engage a licensed electrician to install the LED driver inside a junction box or wall cavity.
- For any structural modification or large openings in an external or load-bearing wall, consult a structural engineer.
- Do not rely on adhesive or tape to carry heavy loads.
Shelf maintenance and care
- Clean finished wood with a soft cloth and dedicated wood cleaner; avoid abrasive chemicals.
- Inspect anchors and screws every 6–12 months, especially in coastal homes.
- Check lighting connections and heat dissipation of LED strips to avoid shortening lifespan.
Homey consultation
If you want custom shelf design or a load assessment for your wall, Homey offers Interior Design Consultation, Homey Custom Wall Carpentry, and Homey Smart Lighting Installation. Book a design consultation to check measurements, select materials, and receive an execution board and an electrical plan.
Frequently Asked Questions
- How do I choose the right shelf depth for books?
A 20–30 cm depth is usually sufficient for most books (8–12 in). Oversized books or large binders require closer to 30 cm.
- What is the difference between fixing to a stud and using a toggle bolt?
Fixing to a stud is stronger because the screw embeds into real structural timber; toggle bolts are useful when studs are not available but have lower heavy-load capacity.
- Can I hide an LED strip power cable inside the wall?
Yes—provided you use proper electrical conduit and a licensed electrician to run cables through cavities or in a covered surface raceway to avoid exposed wiring.
- How do I prevent a shelf from sagging under book weight?
Use adequately thick shelving (solid wood or reinforced plywood) and support it at studs every 40–60 cm or with internal metal supports.
- What’s the best way to style small display shelves without clutter?
Use odd-number groupings (3 or 5 items), reserve approximately 25–35% negative space, and combine items of varying heights and colors to create balance.
- Does the climate in Egypt affect material choice?
Yes—coastal areas need rust- and moisture-resistant anchors and materials. Avoid untreated woods in humid locations.
- When do I need a structural engineer?
When installing very long shelves on a load-bearing wall or making large openings in an external wall.
References
- (https://www.architecturaldigest.com/gallery/how-to-build-wall-shelves)
- (https://www.houzz.com/magazine/5-ways-to-style-shelves-like-a-pro-stsetivw-vs~154957323)
- (https://shelfology.com/pages/the-ultimate-guide-to-floating-shelves)
Practical placement and installation tips to avoid surprises
Think of each shelf as a small workspace: place frequently handled items where you can reach them without stretching, and reserve higher or lower runs for objects you access rarely. Consider how the shelf relates to nearby seating, screens and lighting so that sightlines remain clean and items aren’t blocking light sources or vents. For electronics and enclosed decorative pieces, leave a small void behind the item to allow air circulation and easier cable routing; this both protects the object and simplifies maintenance.
Before any fasteners go into the wall, walk through the installation mentally and on paper: arrange a mock layout on the floor or use paper templates taped to the wall to verify spacing and proportion. Choose fixings that match the wall material and intended load, and plan to spread weight over several attachments rather than relying on a single point. After fitting, tighten and test each support with a realistic load before styling, and protect surfaces where metal meets painted walls with thin rubber or felt pads to prevent staining or abrasion.
- Map everything you plan to display and place the most-used pieces within easy reach; use placeholders to check visual balance before drilling.
- Confirm structural points with a dedicated detector, then mark multiple attachment points to distribute forces and reduce deflection.
- Allow a service gap or removable panel for any concealed lighting drivers or cables so you can access them without removing the shelf.
- Use protective pads between bracket plates and finished walls to prevent micro-movements that can damage paint or plaster.
- Once installed, apply a staged loading test: add weight gradually and check for movement or cracks rather than loading the shelf fully at once.
Frequently Asked Questions
How can I hide LED strips or power supplies without making future access difficult?
Run LED channels into a shallow recess or behind a removable trim strip so the light source is out of sight but the driver remains reachable. Leave a small access panel or hidden gap at one end of the run for servicing and avoid permanently sealing the electrical connections.
What’s the best approach for rental walls where you can’t use heavy anchors?
Opt for freestanding shelving systems, ladder-style units that lean against the wall, or lightweight modular shelves secured with minimal, noninvasive fixings. Where anchors are permitted, use options designed for hollow substrates that distribute load, and check with your landlord before larger interventions.
How do I prevent long runs from sagging over time?
Break long spans into shorter modules or introduce discreet vertical supports; choose a stiffer shelf material or add a reinforcing strip along the underside. Regularly inspect and tighten fixings after the first few weeks of use to catch any initial settling.
For a coordinated solution tailored to your space, explore related Homey Decor services and products, and browse Homey’s selected home products on Amazon. Homey Decor services | Homey on Amazon