Introduction
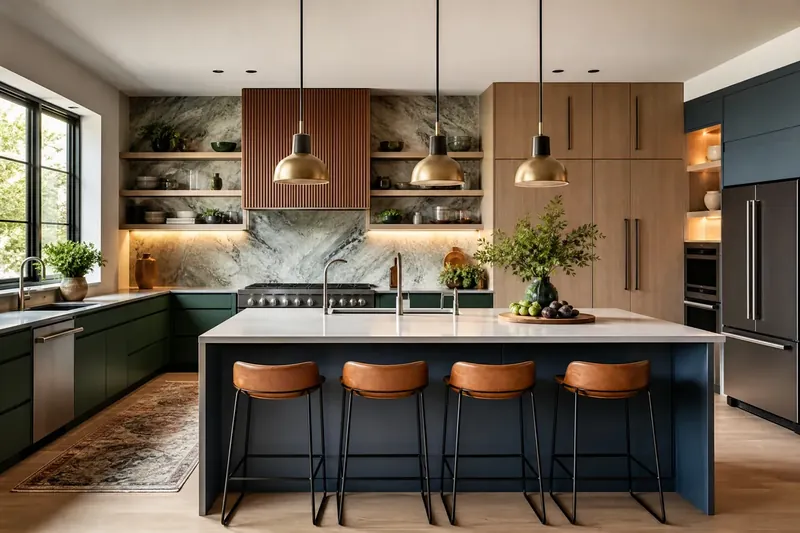
Before the first hammer or ordering fabric samples for cabinetry, every successful kitchen project needs a clear execution plan. This practical brief helps villa and home owners in Egypt and the region make informed decisions: assess the space, organize cooking workflow, select materials, and hand over the contractor package with realistic schedules.
Assessing the Space — Initial Measurements
- Start by measuring the net space using the metric system (m² for area, cm for length and width). Record ceiling height, locations of columns, windows, and doors. In common Egyptian villas, service kitchens may start at 8–18 m²; guest/entertaining kitchens commonly range 20–40 m² or more.
- Maintain a base plan of load-bearing walls and the positions of services (drainage, power feeds, gas, ventilation). Do not change positions of load-bearing walls or main drainage runs without consulting a qualified structural engineer.
- Define circulation paths: aisles should be at least 100–120 cm for a single cook; 120 cm or more for two cooks. (1.00 m ≈ 3.28 ft.)
Work Triangle vs. Zones: Which to Choose?
- The traditional work triangle (fridge–sink–cooktop) suits smaller spaces and reduces unnecessary movement. As a rule of thumb, each triangle leg should be between 1.2–2.7 m, and the total perimeter of the triangle between 4–7.9 m (guideline figures).
- The Zones approach (prep, cooking, baking, cleaning, storage) is better for large or family kitchens where more than one person shares tasks.
- Practical example for a Cairo villa: if the family both cooks and entertains, consider a central island with a dedicated baking zone on one side and a cleaning zone opposite to reduce traffic crossing between areas.
Layout Types — Advantages and Disadvantages
L-shaped
- Advantages: flexible, good for open-plan spaces and allows for an island. Works well for zoning.
- Disadvantages: may lack storage if vertical heights aren’t planned.
U-shaped
- Advantages: ample worktop and storage; easy to configure the triangle.
- Disadvantages: requires more space and can feel closed off in open-plan layouts.
Galley (Corridor)
- Advantages: highly efficient for the triangle; excellent for narrow spaces.
- Disadvantages: limited when more than two people work; can feel cramped.
Island (single or double)
- Advantages: adds work/seating area and storage; ideal for open-plan kitchens.
- Disadvantages: requires at least 100–120 cm clearance around the island for circulation; higher cost.
Improving Storage and Cabinetry: Use Vertical Space and Drawers
- Use tall cabinets up to the ceiling to increase storage, with deep drawers and pull-out shelves to reach the back easily.
- Organize drawers with internal units (dividers, vertical pan racks, dedicated pan drawers) instead of relying on open shelving to boost efficiency.
- Invest in pull-out corner shelves or rotating corner systems to avoid dead zones.
- In the region’s climates (humidity in Cairo or Alexandria), choose moisture-resistant materials for shelving and dividers.
Worktops and Flooring Choices: Durability, Maintenance, and Aesthetics
- Worktops:
- Natural stone (granite/quartzite): durable, high-end look; requires medium maintenance. Engineered quartz is lower maintenance compared with natural stone.
- Polished cement or micro-concrete: contemporary industrial look; requires sealing to prevent staining.
- Treated wood: warm and practical for prep, but needs maintenance and is vulnerable to water exposure.
- Flooring:
- Ceramic/porcelain: durable and easy to clean; suitable for variable climates.
- Polished concrete/marble: beautiful but can be sensitive to scratching and staining.
- High-quality vinyl flooring: water-resistant and comfortable to stand on.
- Consider heat resistance, chemical impact resistance, and ease of cleaning. Match finishes with cabinet colors and wall treatments for a cohesive look.
Layered Lighting Distribution: Essential for Every Prep Zone
- Task lighting: over worktops, cooktop, and sink. Use linear under-cabinet LEDs with proper diffusers to avoid glare.
- Ambient lighting: distributed ceiling fixtures or recessed lights to provide overall illumination without heavy shadows.
- Accent lighting: to highlight backsplashes, glass cabinets, or display shelves.
- Example placement: run LED strips under cabinets along preparation runs, and pendants over an island hung 70–80 cm above the work surface.
Appliances and Fixtures: Placement and Usability
- Place appliances according to workflow: fridge near the grocery entry, a central prep area between fridge and sink, and ovens at a comfortable height (eye level or built-in).
- Plan for sufficient electrical outlets and dedicated circuits for heavy appliances (oven, dishwasher, microwave, refrigerator). Use a licensed electrician to calculate loads.
Handover to Contractor — Final Checklist
- Documents to hand over:
- Final construction drawings (floor plans, elevations, sections).
- Bill of materials and finishes with color and material codes (cabinets, worktops, flooring, finishes).
- General electrical layout and lighting axes, data points, and appliance locations.
- Plumbing and ventilation layout and water points.
- Appliance specifications with cut-out sizes and ventilation requirements (oven, dishwasher, hood).
- Detailed schedule with milestones and interim deliveries.
- Practical tips: require a staged sign-off (defect listing) before paying large installments. Request physical samples (floor samples, worktop samples) before final purchase.
Quick Decision Table: Choose Layout by Typical Scenario
| Common Scenario | Recommended Layout | Why |
|---|---|---|
| Narrow space/city apartment | Galley or L-shaped | Efficient circulation and adequate work surface |
| Large family/social kitchen | Island + Zones | Multiple work areas and family gathering space |
| Luxury hospitality kitchen | U-shaped with island | Large surfaces and generous storage |
| Single professional cook | Galley with high-spec equipment | Shorter distances and linear workflow |
Detailed Contractor Handover Table
| Item | Responsible | Due Date | Status (initial/approved/completed) |
|---|---|---|---|
| Final construction drawings | Design engineer / Homey | ____ | ____ |
| Final site measurements | Contractor / Measuring team | ____ | ____ |
| Appliance orders & approvals | Owner + Homey | ____ | ____ |
| Municipal approvals/permits (if any) | Owner/Contractor | ____ | ____ |
| Detailed schedule | Contractor | ____ | ____ |
| Electrical & plumbing testing | Licensed electrician/plumber | ____ | ____ |
Note: verify local permit requirements and engage specialists for excavation, plumbing, and electrical work.
Additional Decorative Elements (Region-appropriate)
- Include a small open coffee and provisioning nook to manage morning guests.
- Use glass panels or moisture-resistant boards instead of tile behind the cooktop to simplify cleaning.
- Ventilation options for hot, stagnant climates: high-capacity extraction fans and properly designed air outlets.
- Decorative water panel (optional) as a visual divider in open-plan spaces: use a transparent vertical bubble-water panel with calm illuminated bubbles rising gently from the bottom to the top for a soothing effect (do not describe as falling water).
Amazon
We recommend browsing this storefront to review accessory categories useful during planning such as drawer organizers, under-cabinet LED strips, kitchen taps, cabinet pulls, and pantry storage containers: Amazon storefront
Note: Always check actual specifications and measurements, read user reviews before purchase, and consider visiting a local store or viewing samples before final decisions.
When to Engage Homey Services
If you want to turn the plan into a realistic build without surprises: book a Homey Interior Design Consultation, request Homey 3D Spatial Planning to view a three-dimensional model, use Homey Custom Cabinetry Services for bespoke cabinetry built to measure, and engage the Homey Lighting Design Package to distribute lighting by function. These services can help move from concept to a practical, beautiful kitchen.
Frequently Asked Questions
1) Do I have to follow the work triangle in every kitchen?
- The work triangle is a traditional guideline useful for small and medium kitchens, but it is not mandatory; zoning offers flexibility for family and professional kitchens.
2) What is the minimum clearance around an island?
- The recommended clearance for a single cook is 100–120 cm; for kitchens with more than one person working, aim for 120 cm or more. Check actual space before finalizing the design.
3) Which flooring is better for Egyptian residences: ceramic or vinyl?
- Both are practical: ceramic is durable and suits hot climates, while vinyl is comfortable and water-resistant. The final choice depends on budget and comfort preferences.
4) How do I protect cabinets from humidity damage?
- Use moisture-resistant materials or finishes, leave ventilation gaps near appliances, and avoid installing cabinets directly on the floor in high-humidity areas.
5) What documents do I need to start work with a contractor?
- Final construction drawings, electrical and plumbing layouts, a bill of materials and specifications, and a clear schedule with inspection points.
6) Can I integrate a laundry/utility area inside the kitchen without problems?
- Yes, with careful planning: isolate the cleaning area from prep zones and manage circulation to avoid mixing activities.
7) What should I do if I discover a structural issue during construction?
- Stop work in the affected area, consult a licensed structural engineer, and revise the construction drawings after assessment.
Conclusion and Call to Consult
Careful planning before execution saves time and money and reduces costly on-site changes. If you want a full execution package—from site measurements to construction drawings and contractor handover—Homey’s team is ready to provide Homey Interior Design Consultation, Homey 3D Spatial Planning, Homey Custom Cabinetry Services, and the Homey Lighting Design Package to help turn your ideas into a functional and beautiful kitchen.
References
- Kitchen Design Guide (https://kitchendesign.io/blog/how-to-design-a-kitchen)
- Home Depot — How to design a kitchen floor plan (https://www.homedepot.com/c/ai/how-to-design-a-kitchen-floor-plan/9ba683603be9fa5395fab90198755a57)
- Build Design Hub — Kitchen renovation planning (https://www.builddesignhub.com/interior-design/kitchen-renovation-planning)
Practical On-site Choices and Maintenance Tips for Egyptian Kitchens
Think about the everyday conditions your kitchen will face: strong sunlight, airborne dust, and seasonal humidity all affect material performance and cleaning cycles. Prefer finishes and worktop materials that resist staining and wipe-clean easily, and choose cabinet surfaces designed to withstand moisture near sinks and windows. For ventilation, prioritize an extractor that vents to the exterior when possible and position windows or vents to promote cross-flow; good airflow reduces cooking odors, heat buildup and the long-term impact of humidity on joinery.
Make a few decisions early to avoid costly changes later. Fix the positions of major services — drainage, gas runs and heavy electrical feeds — before committing to built-in joinery. Request a small mock-up of a cabinet run or the island edge so you can confirm proportions and handle clearances in real life. Insist on removable access panels behind appliances and below sink bases so future maintenance doesn't require removing finished cabinetry. Finally, plan simple maintenance routines (quick wipe-downs after cooking, periodic seal checks for worktops and door hinges) to keep the kitchen performing well with minimal fuss.
- Place the hob and oven where ducting to the exterior is straightforward; even a short, straight vent run improves extraction.
- Group heavy plumbing appliances close to existing drains and gas connections to reduce disruption and installation time.
- Ensure adequate accessible power points on worktop walls and plan separate feeds for major appliances; confirm switch positions on-site before final tiling.
- Select cabinet finishes and hardware that tolerate frequent cleaning—matte or textured laminates hide dust and fingerprints better than high-gloss in dusty climates.
- Include removable service panels and an organized ‘as-built’ folder of drawings and appliance manuals for easier future repairs.
Frequently Asked Questions
How can I protect wooden cabinets from moisture and dust?
Choose moisture-resistant board for areas near sinks and cooktops, and prefer sealed, laminated or lacquered surfaces that are easy to wipe. Add discreet seals at baseboards and keep ventilation active to reduce trapped humidity. Regular cleaning and avoiding prolonged exposure to steam will extend the finish life.
Is it easy to move the sink or gas hob after installation?
Relocating major services is possible but typically adds time and cost because it involves rerouting drainage, gas and electrical feeds and may need structural or floor adjustments. Finalize service locations during the planning stage where possible and treat later moves as a significant change request with your contractor.
Should an electrician and plumber be present during installation?
Yes — have the trades involved during rough-in and at final fit-out to verify circuit connections, socket positions and water/gas hookups. Their on-site input reduces guesswork, speeds troubleshooting, and helps prevent rework once finishes are in place.
For a coordinated solution tailored to your space, explore related Homey Decor services and products, and browse Homey’s selected home products on Amazon. Homey Decor services | Homey on Amazon