Short, practical introduction
Start by measuring the room proportions (length × width × height) before committing to any ceiling or feature-wall decision. Your first decision should be whether the room prioritizes vertical height (ceiling-first) or the length of a back wall (feature-wall-first). This practical guide gives fast rules, applied examples for Egypt and the Middle East, decision checklists and material tables with acoustic performance metrics.
Measuring proportions — how to determine ceiling height and feature-wall scale
- Practical rule: For large living rooms (over 30 m²) aim for a ceiling height ≥ 3.0 m (≈ 9.8 ft) for a luxurious feel; for smaller rooms (10–25 m²) prefer 2.7–2.9 m. These are guidelines — check golden ratios (length-to-width ≈ 1.6) to keep a balanced visual distribution.
- Egyptian example: In older Cairo flats with original high ceilings, maintaining 3.4–3.8 m with added wood delineation emphasizes luxury without visual clutter.
- Feature-wall scale: Do not make a feature wall narrower than 40–50% of the front elevation or of the opposite wall if you want to retain visual balance.
Material selection: balance luxury with acoustic performance
- High-performing visual and acoustic options: wrapped fabric panels, perforated MDF with absorption backing (perforated MDF + mineral wool), opaque recycled PET panels, wood slats spaced over an absorptive backing.
- Practical NRC values: fabric-wrapped panels or PET panels: NRC 0.6–0.9; wood slats with absorptive backing: NRC 0.4–0.7; dense non-porous panels: NRC ≤ 0.2 (compensation required).
- Regional tip: Use locally sourced treated timber or MDF with authentic wood veneers for a warm look suited to Cairo and Alexandria climates; in humid coastal or Red Sea climates choose moisture-resistant materials or protective coatings.
Integrating indirect lighting with architectural surfaces
- Principles: Hide the light source inside ceiling coves or linear LED channels with diffusers for a soft glow. Keep the emission angle ≤ 45° to reduce direct glare.
- Practical specifications: LED strips at 2700–3000K for intimate areas, 3000–3500K for general areas; CRI ≥ 90 for artwork and luxury materials.
- Installation details: Leave a mounting gap ≥ 20–40 mm between the LED channel and the opposite surface to avoid unwanted shadowing; ensure cable runs are ventilated to prevent overheating.
Strategies for sound absorption in open-plan spaces
- Multi-layer approach: combine absorption (soft furnishings, rugs, soft panels) + scattering/diffusion + structural isolation where needed.
- Effective elements: ceiling clouds 50–100 mm thick with a mineral-wool or PET absorptive core; feature walls with perforations or slats in front of absorptive backing.
- Practical targets: aim for an average RT60 for living areas of 0.6–0.8 s; for multi-function spaces (with a home cinema) subdivide the space or increase wall/ceiling absorption.
Architectural details and connectors: common failure points and how to avoid them
- Common mistakes:
- Insufficient structural support for heavy timber façades or ceiling heaters.
- Omitting expansion gaps for wood/MDF leading to splitting.
- Covering ventilation openings or lighting fittings in a way that prevents access.
- Using absorptive materials without moisture protection.
- How to avoid them: document fixing details (cross-sections), request factory assembly drawings, and use a qualified electrician to inspect power runs.
Harmonizing the material palette between the fifth wall and vertical walls
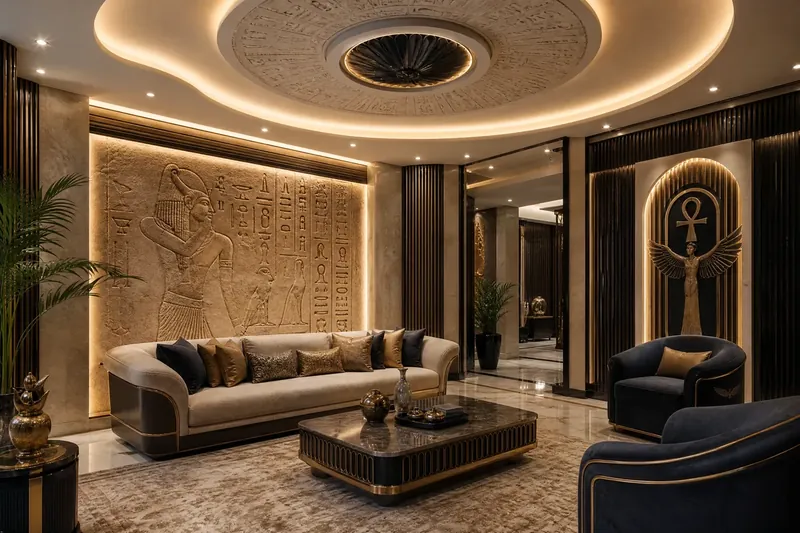
- Visual approach: choose a base tone (for example light walnut or subtle gray) and use it as the reference, then add accent tones (polished metal, marble, fabric) in lower coverage on the feature wall.
- Texture balancing: if the ceiling is articulated with wood beams, make the feature wall smooth or glassy to enhance contrast, or vice versa; a subtle repeat of the same material strengthens cohesion.
- Example: a slatted wood ceiling in a North Coast villa paired with a marble feature wall and copper leaf accents to balance warmth and sheen.
Execution details: gaps, edges, and future maintenance
- Expansion gaps: for wood and composites, leave 3–10 mm depending on board width and fixing method. In hot/humid climates (Egypt) allow a larger margin.
- Access edges: include access panels at lighting units or electrical components to ease maintenance.
- Maintenance: set a cleaning and maintenance plan — dusting cycles and re-cleaning/re-covering fabrics every 3–7 years depending on exposure.
Water bubble panels and safe integration
- Technical description (required): a transparent vertical bubble-water panel with calm illuminated bubbles rising gently from the bottom to the top inside a specialized glass/acrylic enclosure — used as a visual divider or a focal element without water falling out.
- Installation requirements: secure and load-tested base mounting, electrical protection for components, and child-safety barriers. Do not use these panels as bathroom fixtures without reviewing moisture resistance and safety regulations.
Quick decision table / checklist
| Decision question | When to choose Yes | When to choose No | Practical note |
|---|---|---|---|
| Is the room ≥ 30 m²? | Yes: consider a high ceiling ≥ 3.0 m | No: keep height 2.7–2.9 m | Area determines the perceived spaciousness |
| Do you need medium/high acoustic absorption? | Yes: use NRC ≥ 0.6 on ceilings/walls | No: use thinner decorative finishes | Multi-use rooms need higher absorption |
| Will you include maintainable hidden lighting? | Yes: plan access panels and cooling paths | No: use direct lighting with protections | Service access reduces future costs |
| Are there children or pets? | Yes: avoid sharp edges and low-hung suspended panels | No: you can expand material options | Protect glass and hanging elements |
Quick installation checklist
- [ ] Accurate measurement of dimensions and vertical plumb.
- [ ] Physical material samples (at least 300×300 mm) for every finish.
- [ ] Detailed cross-section drawing for the ceiling-to-wall junction with gap specifications.
- [ ] Acoustic sample test (RT60 or trial NRC) in a local environment.
- [ ] Electrical plan that accommodates LED cooling and connections.
- [ ] Consideration for maintenance access and inspection openings.
Material list and approximate NRC values (for reference)
| Material | Typical use | Approx. NRC |
|---|---|---|
| Compressed PET panels | Smooth wall panels | 0.6–0.9 |
| Fabric-wrapped panel | Feature wall / acoustic core | 0.6–0.8 |
| Wood slats over absorptive backing | Modern ceiling & wall | 0.4–0.7 |
| Dense non-porous panel | Decorative highlights | ≤0.2 |
| Perforated panel with mineral wool backing | Balanced appearance and echo control | 0.6–0.85 |
Practical tips for coordination with HVAC
- Avoid blocking air inlets: keep 50–100 mm clearance around main air paths or use disguised grilles.
- When adding heavy acoustic insulation near vents, review thermal performance to avoid heat build-up.
Common installation failures and aftercare fixes
- Longitudinal wood cracks: usually from missing expansion gaps — fix with controlled cuts and flexible foam filling.
- Obvious LED glare: install diffusers/flat covers or adjust emission angle.
- Flutter echo on tiled walls: add absorptive strips or audio diffusers.
Budgeting and construction planning (practical notes)
- Request detailed quotations that separate structural support, electrical work and finishing fastenings.
- Allocate an additional 10–20% contingency for site adjustments (not for redesign).
Amazon section — recommended browsing
To review product categories that help with planning (architectural wall panels, acoustic boards, linear LED channels, ceiling diffusers, smart lighting controllers) we recommend checking the general Amazon storefront and matching specifications to physical samples: Amazon storefront
Note: We do not confirm availability of specific products in the store; verify the product descriptions, performance certifications and technical specifications before purchase.
Call to consult with Homey
If you are planning to renovate a luxury living room or a large reception hall, the Homey team is available for: Homey Interior Design Consultation, Homey Custom Architectural Millwork, Homey Acoustic & Lighting Integration Service, Homey 3D Spatial Rendering. Start with a consultation session to assess proportions, samples and a site-specific execution strategy.
Frequently Asked Questions
Q1: How do I decide whether I need a high ceiling or a larger feature wall?
A1: Start by measuring the room. If the space is ≥ 30 m² or you want an airy, luxurious feeling, a higher ceiling is preferable. For feature walls, aim to cover 40–60% of the room front elevation while considering existing furniture.
Q2: What materials are best to reduce echo in an open living room?
A2: A mix of PET panels or fabric-wrapped panels, sparsely placed wood slats over absorptive backing, thick rugs and heavy curtains will outperform a single-material approach.
Q3: How do I integrate hidden lighting without increasing operating cost?
A3: Use efficient low-power SMD LED strips and distribute them well with diffusers; design cable runs for ventilation to reduce LED temperature and extend life.
Q4: What mistakes cause design failure after installation?
A4: Neglecting expansion gaps and structural loads, ignoring maintenance access, and using materials unsuitable for the local climate are common failures.
Q5: Can I install a water bubble panel in a children's room?
A5: Yes, only with additional protections: a secured base, leakproof covers, protected electrical systems and verification of material moisture resistance. It is best to consult a specialist engineer.
Q6: How do I test acoustic performance after installation?
A6: Measure RT60 before and after installation within 125–4000 Hz, or use dB meters and compare results to the materials' quoted NRC values.
Q7: What is the best approach to match wood color between ceiling and wall?
A7: Use an integrated sample board: test samples under similar lighting (2700–3500K) and observe color shifts with daylight variation.
References (for further reading)
- (The Fifth Wall — Ceilings) https://www.asiarchitectural.com/the-fifth-wall-ceilings/
- (3D Acoustic Panel Design Guide) https://unidusacoustics.com/3d-acoustic-panel-design-guide/
- (How Wall and Ceiling Panels Add Texture and Character) https://rulonco.com/how-wall-and-ceiling-panels-add-texture-and-character/
Conclusion
Designing ceilings and feature walls demands a balance of visual proportions, acoustic and lighting performance, and practical execution. Start with accurate measurements, choose materials with documented NRC values supported by physical samples, and plan for access and maintenance. When you are ready, contact Homey for a site assessment and tailored implementation solutions.
Practical steps for installation, durability and upkeep
Successful ceiling and feature-wall schemes depend as much on the project sequence and service coordination as on material choice. Lock in the location of recessed lights, HVAC outlets, speakers and large joinery items before committing to surface finishes; running these trades after the decorative work will add cost and often requires cutting or patching. Insist on a small, accessible service cavity behind linear light runs and behind removable acoustic panels so heat, wiring and insulation can be inspected without dismantling the whole surface. Before full installation, approve a full-scale mock-up with final finishes and lighting at night to confirm how textures, colours and shadowing read in the real room.
Think ahead about longevity and routine care. Choose systems that allow individual panels or slats to be removed and replaced without damaging surrounding finishes—this makes future repairs and upgrades simple. For humid or coastal environments pick products with proven resistance to moisture or apply protective coatings where appropriate, and select fabrics and veneers that can be cleaned with mild, manufacturer-approved methods. Finally, agree a simple maintenance plan with your contractor: visual inspections after completion, a clear cleaning regime, and instructions for addressing minor issues (stains, small cracks, or loose fixings) will extend the life of both ceiling and feature-wall elements.
- Agree the sequence: structural and service work first, then acoustic/light fixtures, then decorative finishes and joinery.
- Require removable or accessible panels around lights and speakers to simplify future servicing and prevent invasive access work.
- Create an in-room mock-up (with final lights on) so you can evaluate colour, texture and shadowing before committing to full runs.
- Specify fixing details that allow single-element replacement (screws in accessible reveal channels, clip systems, or framed modules).
- Choose finishes that are easy to clean and compatible with the local climate; request care instructions from the supplier and record them with the handover pack.
Frequently Asked Questions
Can I add sound-absorbing panels without lowering my ceiling?
Yes. Wall-mounted absorbers, suspended ‘clouds’ that hang a short distance below the ceiling, and slim slatted systems with absorptive backing are common approaches that avoid a full ceiling drop. Ensure suspension points and services are coordinated so the panels don’t interfere with ducts, sprinklers or lighting.
How do I make sure my lighting looks consistent across the room?
Specify matching light sources and controls from the same product family, and ask for samples or a test run so you can see colour and intensity together. Dimmers and controllers should be compatible with the chosen LEDs; verify this during the mock-up stage to avoid mismatched hues or flicker.
When should I involve an acoustic specialist?
Bring an acoustic adviser on board for large open-plan layouts, dedicated media rooms, or when speech clarity is critical. For typical living rooms, a layered approach—soft furnishings, targeted absorbers and diffusers—usually works well, but a specialist will quantify needs and recommend positions and performance levels if the room has unusual geometry or challenging surfaces.
For a coordinated solution tailored to your space, explore related Homey Decor services and products, and browse Homey’s selected home products on Amazon. Homey Decor services | Homey on Amazon