Practical, Actionable Introduction
Redesigning lighting across an entire home is more than swapping bulbs — it’s creating a staged plan that combines ambient, task and accent lighting with smart controls to save energy and protect visual comfort. Start by evaluating each room’s function, define the scope and budgets, and design multi-layered scenes before selecting fixtures. For advanced planning and site surveys you can rely on Homey’s 3D measurements and lighting consultations.
What are the three basic lighting layers and how do they interact?
The core layers are:
- Ambient lighting: provides even, general illumination for a space and sets the baseline visual level.
- Task lighting: focused on work areas such as kitchen counters, a home office desk, or a bathroom mirror; it raises localized light levels so tasks can be done accurately.
- Accent lighting: highlights architectural features or artwork and adds depth and mood.
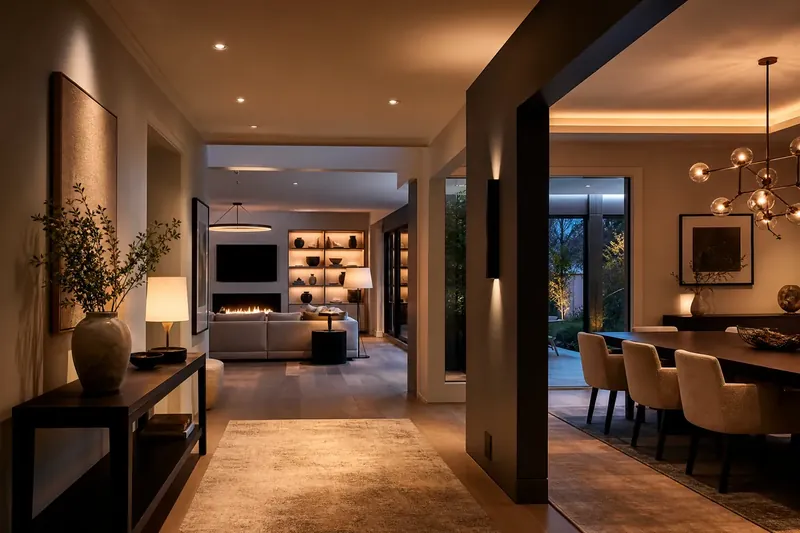
Interaction: Ambient lighting provides the foundation, task lighting raises illumination where needed, and accent lighting creates points of interest. For example, in an open-plan living room with a kitchen, use a warm ambient wash throughout, stronger task lighting over the kitchen island, and selective accent lights on display shelving.
Choosing color temperature (Kelvin) by area
- Living rooms and dining rooms: 2,700–3,000 K (warm) to encourage relaxation and entertaining.
- Kitchens and food-prep areas: 3,000–4,000 K (neutral to mildly cool) to provide clear color contrast while working.
- Home offices and study areas: 3,500–4,500 K to increase focus and alertness.
- Bathroom vanity/makeup mirrors: 3,500–4,500 K with high CRI for accurate color rendering.
- Outdoor yards and garages: 4,000–5,000 K for clarity and safety.
In Egypt and the broader Middle East, account for strong daylight: where large, sun-facing windows exist, use daylight-harvesting control to keep scenes consistent and reduce power consumption.
Causes of glare and how to eliminate it with fixture distribution and diffusing mounts
Common causes of glare: large brightness contrast between a light source and its surroundings, exposed fixtures with narrow beam angles, or reflective surfaces.
Mitigation measures:
- Use diffusers to reduce the apparent brightness of direct sources.
- Choose directional or shielded fixtures so they are not in direct line of sight.
- Adopt indirect lighting (e.g., cove lighting) or conceal fixtures behind crown moldings.
- Use low-lumen fixtures at eye level and increase density where task lighting is needed.
- Maintain moderate contrast ratios between wall surfaces and light sources to prevent eye strain.
Smart controls and automation to improve energy and daily mood
Useful smart functions:
- Preset scenes for common modes: daily, entertaining, TV watching, sleeping.
- Motion and occupancy sensors to reduce runtime in corridors and bathrooms.
- Daylight harvesting: reduce artificial lighting when sufficient daylight is present.
- Scheduling and synchronization with HVAC or motorized shades to save energy.
- Circadian tuning: reduce blue light in the evening.
Integration: systems can connect via Zigbee, Z‑Wave, Wi‑Fi or whole-home networks to form groups and scenes using Homey Smart Lighting Integration.
Balancing lumens, watts and CRI when selecting fixtures
- Lumens (lm) measure emitted light; design to target illuminance (lux) per space.
- Watts (W) measure power consumption; with LEDs focus on lumen-per-watt efficiency instead of watts alone.
- CRI (Color Rendering Index): choose CRI ≥ 80 for general areas and CRI ≥ 90 for kitchens, dressing rooms and artwork.
Quick rule: Don’t pick fixtures by wattage alone. Request lumen output per source, lumen/watt efficiency, and the light distribution (beam angle) to determine coverage and intensity.
Common design mistakes to avoid
- Relying on a single central light source only.
- Mixing conflicting color temperatures in connected spaces without a scene strategy.
- Ignoring task lighting for kitchens and desks.
- Forgetting dimming and appropriate control options.
- Leaving fixtures without diffusers or proper shields, causing flicker or glare.
- Ignoring access for maintenance, bulb replacement and electrical measurements.
Quick decision sheet and printable lighting planning checklist
| Space | Recommended illuminance (lux) | Kelvin range (K) | CRI | Suggested fixture types | Glare-resistance measures |
|---|---|---|---|---|---|
| General living room | 100–300 lx | 2,700–3,000 K | ≥ 80 | Low-level ambient + floor lamps + accent lights | Distributed lighting, diffusers on fixtures |
| Kitchen — work surfaces | 300–700 lx | 3,000–4,000 K | ≥ 90 | Under-cabinet task lights + downlights + directed island lighting | Direct lighting with shields, avoid reflections off glossy surfaces |
| Home office | 400–600 lx | 3,500–4,500 K | ≥ 90 | Directional desk lamp + adjustable ambient | Use matte fixtures and aimed angles |
| Bedroom | 100–200 lx | 2,700–3,000 K | ≥ 80 | Warm ambient + bedside reading lamps | Dimmers, indirect lighting |
| Bathroom — vanity | 500 lx at the mirror | 3,500–4,500 K | ≥ 90 | Side-mounted mirror lights or evenly distributed LED edges | Use diffusers and broad light sources to avoid facial shadows |
| Corridors & entries | 100–200 lx | 3,000 K | ≥ 80 | Distributed ceiling fixtures + motion sensor | Sensors and lower brightness levels to reduce glare |
Notes: lux = lumens/m^2. Adjust values based on ceiling height, surface reflectance and window area. Consult a lighting engineer for precise calculations.
Practical project examples from Egypt and the Middle East
- Apartment in Cairo: for an open-plan kitchen–living layout use 3,000 K ambient with hidden LED strips in the cornice to provide indirect illumination that reduces glare during daytime, and increase task lighting over marble counters to 4,000 K with CRI ≥ 90 for cooking.
- Villa on the Red Sea: use 4,000–5,000 K outdoor path lighting for safety, with warm 2,700–3,000 K outdoor scenes on the terrace to create a relaxed evening atmosphere.
- Home office in the UAE: implement circadian tuning to shift Kelvin over the day (cooler in the morning for work, warmer in the evening).
Using special accent elements: bubble-water panels
As a decorative accent, a transparent vertical bubble-water panel with calm illuminated bubbles rising gently from the bottom to the top can be used as an indirect decorative light source. It can be integrated into room dividers or placed behind seating areas to create a moving focal point without visible water splash. Observe electrical safety and installation requirements by qualified technicians when integrating any water-containing element with lighting.
Recommended Amazon section for sourcing and vetting
For quick product research on categories we typically use (smart LED bulbs, dimmable fixtures, under-cabinet lighting, adjustable track lighting, smart switches and dimmers) you can browse Homey’s Amazon storefront for reviews and inspiration: Amazon storefront
(We recommend checking specifications, CRI and wireless protocol support before purchase — we do not guarantee the availability of every item on the storefront.)
When you need an engineer or qualified electrician
Hire a specialist when: - Modifying mains loads or adding new circuits. - Working with ceiling penetrations or creating cavities for recessed fixtures. - Work interfaces with plumbing or water-containing elements (such as bubble-water panels). - Addressing safety requirements for children or public gatherings.
Conclusion and Homey consultation offer
Early lighting planning saves time and money and preserves visual comfort and ambiance in your home. If you’d like a tailored plan, Homey’s team can provide: interior lighting consultations, smart system integration, and 3D visualizations of the lighting scene before implementation.
Book an interior lighting consultation with Homey (Homey Interior Lighting Consultation), request smart integration via Homey Smart Lighting Integration, or order a 3D scene through Homey 3D Spatial Lighting Renderings to start your project confidently.
Frequently Asked Questions
Q: What’s the practical difference between lumens and watts?
A: Lumens measure the amount of light emitted; watts measure energy consumed. With LED technology focus on lumens and efficiency (lumens/watt) rather than wattage alone.
Q: Should color temperature be uniform across the whole home?
A: Not necessarily; it’s better to choose temperatures that suit functions (warm for living, neutral/cool for tasks) and use smart scenes to smooth transitions between areas.
Q: How do I reduce glare in a room with large glass windows?
A: Use indirect lighting, diffusers and fixtures angled so they don’t reflect directly on the glass. Smart dimming when daylight is available reduces harsh brightness differences.
Q: What CRI is appropriate for a home kitchen?
A: We recommend CRI ≥ 90 in cooking and vanity areas because accurate color rendering is important for food prep and appearance.
Q: Do smart lighting systems provide real energy savings?
A: Yes, when applied correctly — especially with motion sensors, daylight harvesting and dimmable scenes that reduce unnecessary runtime and lower consumption.
Q: How do I choose between a smart dimmer and a traditional switch?
A: Choose solutions compatible with your control ecosystem (Zigbee / Z‑Wave / Wi‑Fi). Smart dimmers enable scenes and finer energy tuning compared with traditional switches.
Q: Can bubble-water panels be integrated into interior design?
A: Yes — as a vertical transparent panel with calm illuminated bubbles rising gently from the bottom to the top. Ensure safe installation and electrical protection by certified installers.
References
(https://www.lutron.com/us/en/articles/layered-lighting-tips) (https://the-edit.lumens.com/the-guides/the-fundamentals-of-light-layering/) (https://www.tcpi.com/home-lighting-color-temperature-why-they-matter/)
How to implement and refine a whole‑home lighting plan
Move from plan to practice in stages so you avoid costly rewiring or fixture returns. Begin with a quick room-by-room audit: note major light sources, where shadows fall during typical activities, and which switches control which areas. Use temporary lamps or smart bulbs to create provisional lighting scenes — live with those setups for several days so family members can give feedback about comfort at different times of day. That trial period makes it far easier to decide fixture styles, beam angles and whether you need tunable color temperature or extra local lighting for specific tasks.
When you order fixtures and controls, think about installation and future servicing. Confirm that dimmers and smart modules are compatible with the LEDs you plan to use, and ask your electrician to locate drivers and transformers where they have airflow and are accessible. Group switches logically so rooms can be lit in useful zones rather than all-or-nothing, and label everything as work is completed. If you want simulated previews before buying, Homey Decor’s measurement and consultation services can create visualizations to help you choose final fixtures and control strategies.
- Do a day/night walkthrough and take photos from standing and seated positions to identify glare and dark spots before selecting fixture positions.
- Test scenes with plug‑in lamps or smart bulbs for at least a week to evaluate perceived brightness and color comfort at different times.
- Specify LED‑friendly dimmers or smart switches early — swapping incompatible controls after installation is a common source of extra cost.
- Zone lighting so you can turn on only the areas you need (entry, task zones, accent areas) rather than entire rooms.
- Keep a simple maintenance note: record driver locations, spare bulb types, and cleaning frequency so fixtures perform well long term.
Frequently Asked Questions
Can I mix different color temperatures in a single open plan space?
Yes — mixing temperatures is fine when it’s intentional. Use warmer tones for lounging areas and slightly cooler, higher‑contrast light for work zones; soften transitions with dimming or tunable fixtures so adjacent areas don’t feel discordant.
How long should I test a lighting setup before making it permanent?
Live with provisional fixtures and scenes for about one to two weeks, covering both daytime and evening use. That timeframe lets you see how daylight interactions and habitual activities affect comfort and lets other household members provide input.
Are smart bulbs a good shortcut for a full lighting redesign?
Smart bulbs are an excellent way to prototype scenes and color choices without rewiring. For long‑term reliability and best control (especially with multi‑switch setups), consider dedicated smart switches or drivers that integrate with the rest of your system when you move to the final installation.
For a coordinated solution tailored to your space, explore related Homey Decor services and products, and browse Homey’s selected home products on Amazon. Homey Decor services | Homey on Amazon